ben483's Bin Weevils cheat site
SWS

How do i join the SWS?
The SWS stands for Secret Weevils Squad, a top secret organisation available to all weevils. To access SWS, click on the weevil portrait of Clott in your nest. You will then be required to take a quick quiz to test your general knowledge of the bin.
The SWS stands for Secret Weevils Squad, a top secret organisation available to all weevils. To access SWS, click on the weevil portrait of Clott in your nest. You will then be required to take a quick quiz to test your general knowledge of the bin.
===========================ANSWERS===========================
Question 1) level up
Question 2) Lab’s Lab
Question 3) Rum’s Airport
==============================================================
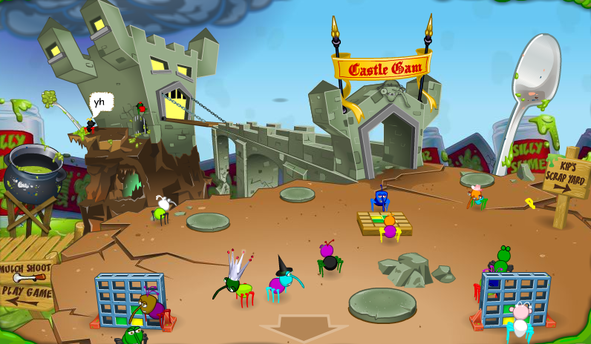
For completing the quiz, you are now a loyal member of the SWS, and have therefore gained access to the SWS Headquarters located at Castle Gam. You would have also been rewarded with 500 Mulch, 50 Experience and a Golden SWS Trophy for your nest.
====================CURIOUS FACTS ABOUT SWS====================
-The SWS Headquarters was previously located at Flem Manor. However, when Castle Gam got a new makeover late November, Castle Gam became the new place to go to access the SWS Headquarters.
-Your weevil used to be required to complete a simple SWS Bubble Hunt before you could call yourself a member.
-SWS Missions used to be available for all weevils, regardless of whether you were a Bin-Tycoon or not.
Question 1) level up
Question 2) Lab’s Lab
Question 3) Rum’s Airport
==============================================================
For completing the quiz, you are now a loyal member of the SWS, and have therefore gained access to the SWS Headquarters located at Castle Gam. You would have also been rewarded with 500 Mulch, 50 Experience and a Golden SWS Trophy for your nest.
====================CURIOUS FACTS ABOUT SWS====================
-The SWS Headquarters was previously located at Flem Manor. However, when Castle Gam got a new makeover late November, Castle Gam became the new place to go to access the SWS Headquarters.
-Your weevil used to be required to complete a simple SWS Bubble Hunt before you could call yourself a member.
-SWS Missions used to be available for all weevils, regardless of whether you were a Bin-Tycoon or not.
1. Jack And The Binstalk. (Level 6)

To start the mission buy the "Giant Beanstalk" plant at the Garden Shop.
(It costs 500 mulch)
(It costs 500 mulch)
2. Jack And The Binstalk.
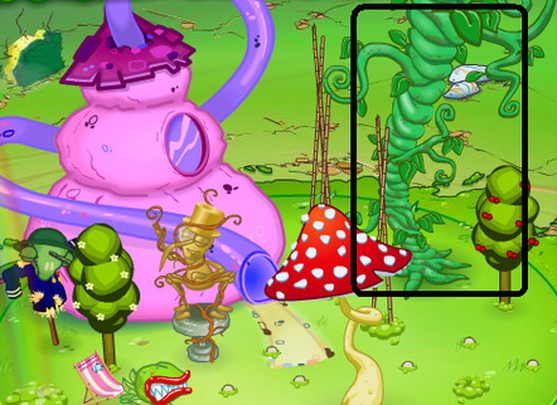
Plant it in your garden and wait for it will grow (It takes 3 days to grow). when its grown climb up it and you can start the mission.
3. Jack And The Bistalk - Cloud Room.
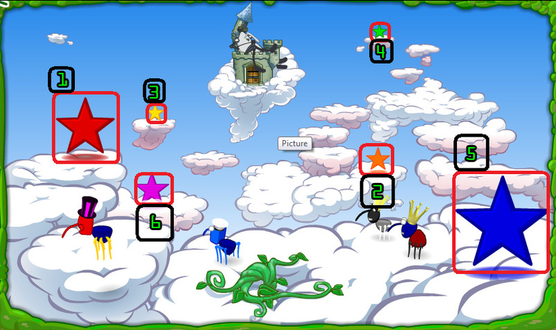
In this room you will have to jump star to star in order.
The order is red, orange, yellow, green, blue, pink.
Once youve collected all the stars a rainbow should fourm with a pad at the bottom of it when you go to the pad, it should take you over to the tower.
The order is red, orange, yellow, green, blue, pink.
Once youve collected all the stars a rainbow should fourm with a pad at the bottom of it when you go to the pad, it should take you over to the tower.
4. Jack And The Binstalk - Entrance Room.
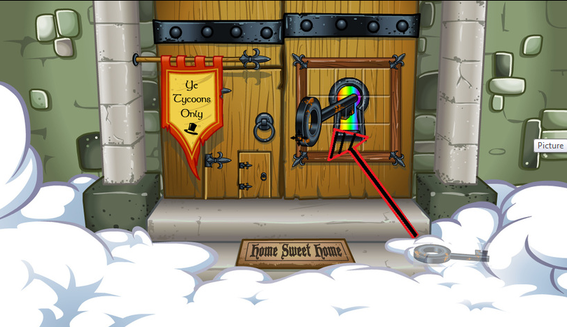
<- The first room of the mission looks like this.In this room you have to complete a slide puzzle.
( The completed puzzle should look like a keyhole).
When you have completed it put the giant key that is on the floor in the keyhole and the door should be unloked to the next room.
( The completed puzzle should look like a keyhole).
When you have completed it put the giant key that is on the floor in the keyhole and the door should be unloked to the next room.
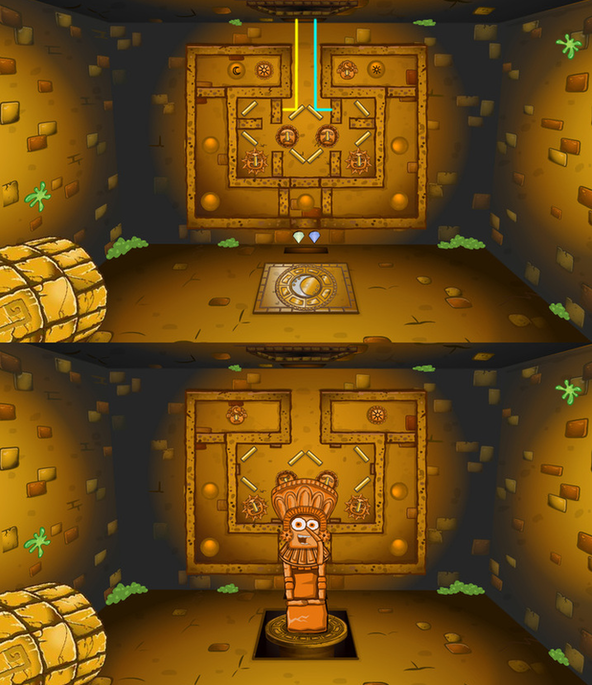
5. Jack And The Binstalk - Cog Room.
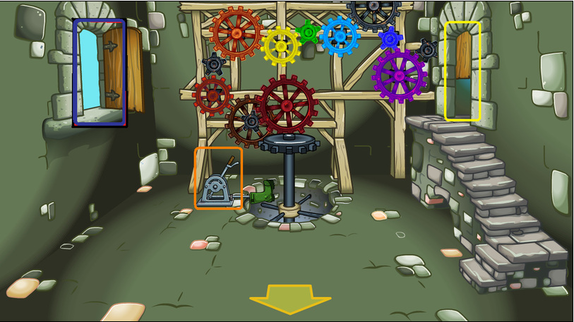
This room is pretty simple. just look at the picture and put the same colour cogs as the same place as the picture.
(There is one cog hidden behind the window on the left)
Once you have them all in the correct place hit the lever. The door will take a while to open, once it opens enter the final room.
(There is one cog hidden behind the window on the left)
Once you have them all in the correct place hit the lever. The door will take a while to open, once it opens enter the final room.
6. Jack And The Binstalk - Tower Room.
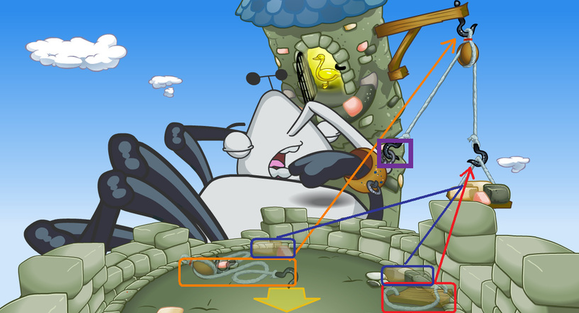
Once you've entered this room, click on the rope with the hooks and drag it on the hook thats on the tower. Now get the board that's on the floor on the bottom right and drag it to the hook on the right.
Get the bricks that are on the floor and put them on the board.
The board should be going down, move the hook thats on the left till it attaches to the hook on its hand.
Get the bricks that are on the floor and put them on the board.
The board should be going down, move the hook thats on the left till it attaches to the hook on its hand.
1. Totem of the aztects - Find The Mission (Level 4)
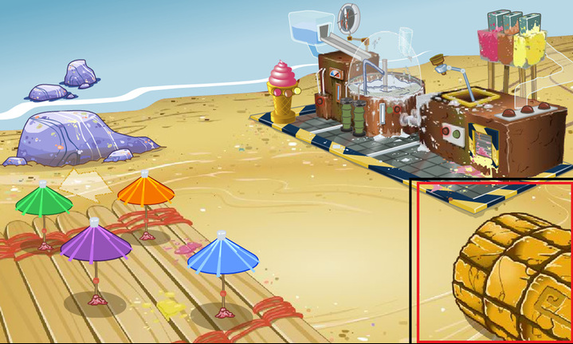
To get to this mission you will need to take a plane to Mulch Island from Rum's Airport. Then go the the Mulch Island Beach, and look at the bottom right of your screen, theres a tunnel, to go down it.
2. Totem of the aztects - Left Room
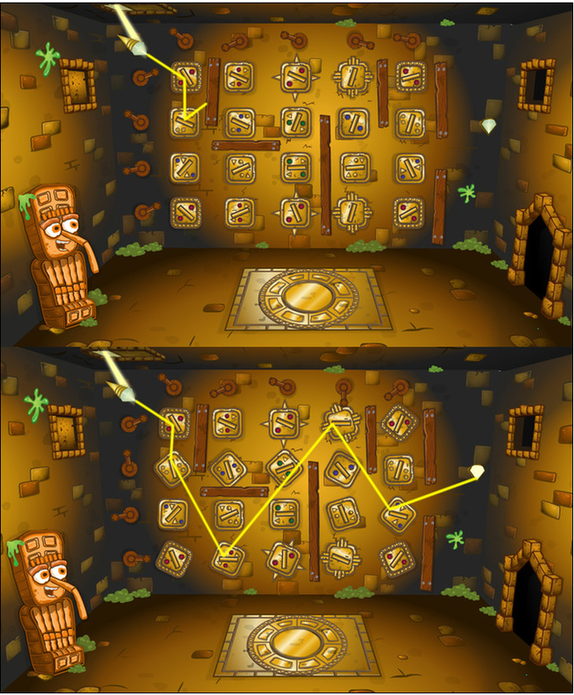
In this room you have to turn the levers and try to get to the diamond on the other side. You can use the wooken boards to help you bounce off and take short cuts. It should look something like the second picture.
3. Totem of the aztects - Right Room
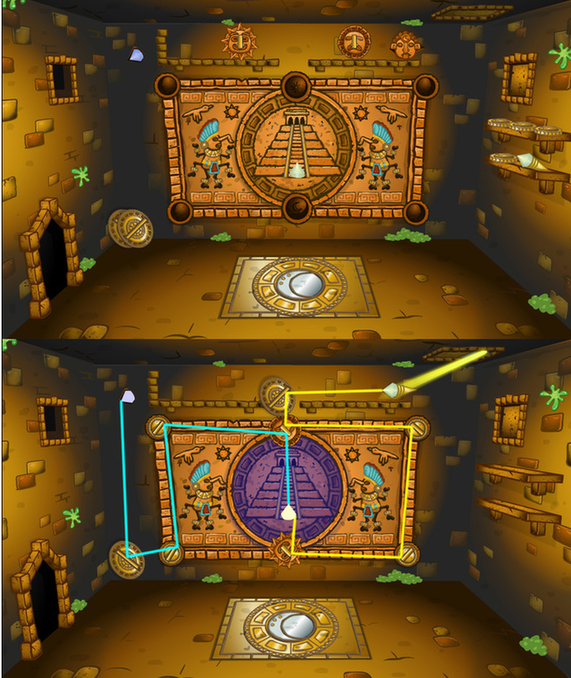
On the shelves on the right there are 4 plates, get them one at a time and put each on a different corner of the picture in the middle (for help look at the bottom picture.)
Get the sun plate fromt he top shelf and drag it to the run ring (circle), do the same with the plate with the sad face and put it on the one under the sun ring.
The move your cursor to the pyramid, and turn the wheel to the opposite side that the rings are in. There is now a light on the top right, move the plate at the end to any place, now get the torch on the right shelf and put it on the light.
There is now a yellow line of beam light, get a plate that is placed against the walll and move it to the place where it will hit the sad face plate, now move the plate till the beam reaches the plate on the right of it.
It will go all the way to teh sun plate, move the beam till it hits the diamond, and there will be a blue beam, get the other plate that is against the wall and put it in a place where it will hit the blue diamond, near the top.
4. Totem of the aztects - Middle Room
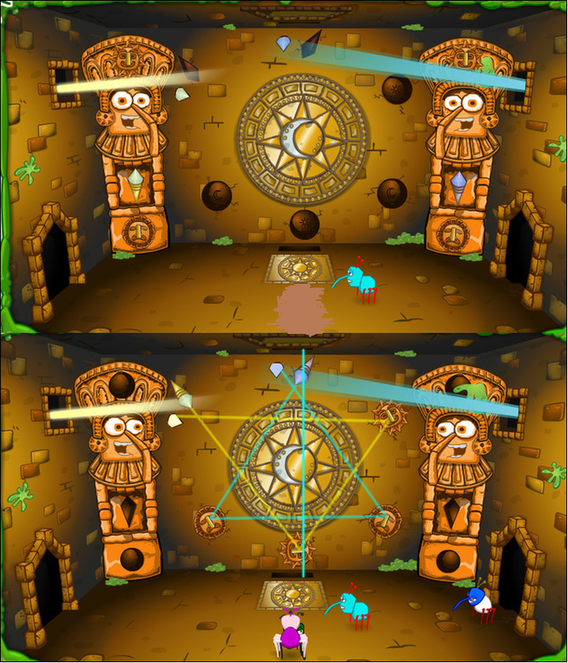
To do this room you MUST HAVE DONE: The Left Room & Right Room. the first thing you need to do is get all the sad face plates and put them in the moon rings (circle things in middle). Do the same for the sun plates, to the sun rings. Then get the torch's and put them in the holes near the middle. The rest of it is hard to explain.
5. Totem of the aztects - Final Room
The objective in this room is to get the moon plate, to the moon pad, and the sun plate, to the sun pad, by moving them to each of those little pads to open walls. then you have to move the laser beems to the 2 diamonds at the bottom!
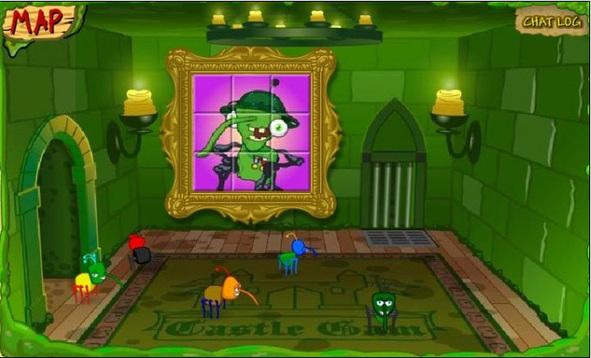
The lost silver knight - Find The Key (Level 8)
You have to find the key first which is located in castle gam in the crack in the floor.
The lost silver knight - Secret Code
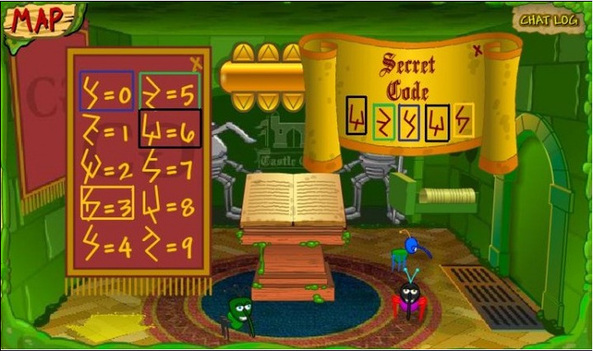
Then go inside Castle Gam and take the right door to start the mission. First you have to click on the wall tile near the left and somewhere under the sign saying 'CG', when you've found the arrow keep moving to the direction that the arrow is pointing.
The lost silver knight - Puzzle
For this part you will need to complete a puzzle.
The lost silver knight - Music Notes
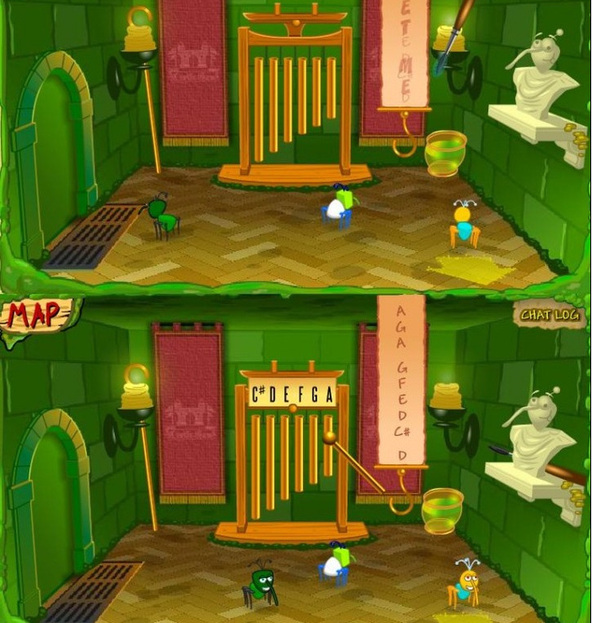
In this room you have to first get the stick on the top right part of the wall (Under the candleon the left), move the stick underthe hook on the top of the roof and drag the hook down as far as it can go.
Now get the giant paint brush that is behind the Clott statue. Dunk the stick into the water bowl (under the candle on the right), paint over the 'WET ME' picture.
Get the playing stick and do 'A,G,A G,F,E,D C#, D' to the bells.
It will now become blue with different letters, now quickly play 'A,G,A E,F,C,# D' on the bells.
It should now play a song on the bells automatically, wait for the song to finish, and now you have access to the last room.
The lost silver knight - Number Jump
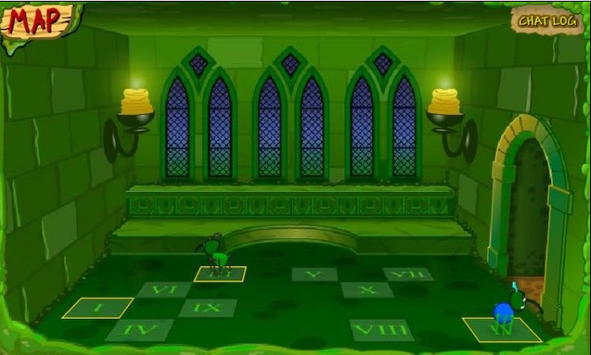
Here you have to jump to the correct number tiles in order. The order is : I, II, III, IV, V, VI, VII VIII, IX, X' and then the Silver Knight should come up - you then click onto it.
